Quickstart:
How to Use Perfect Layout

The strength and time saving of Perfect Layout lies in the processing of completely unoptimized documents.


If you want to test what the plug-in is capable of, don't apply it to a document that has already been manually optimized.
Instead, take an old and unoptimized version of your Finale® document and try the plug-in with that version.
Usually you can find old versions in your Finale "Automatic Backup" folder.

Already manually optimized documents will certainly get some optimizations from the plug-in, but other manual adjustments may be removed or resolved differently.

We recommend testing the plug-in on the first run with the "ES Perfect Layout Demo.musx" as this is an unoptimized, short and complex test file which also creates all necessary font metrics files.
When you start with this test file, just answer all dialogs with "ok" / "yes".
Windows: c:\program files (x86)\Elbsound.studio\Perfect Layout\Docs and Test Files\ES Perfect Layout Demo.musx
MacOS: /Library/Application support/Elbsound.studio/Perfect Layout/Docs and Test Files/ES Perfect Layout Demo.musx

In your first experiments always run the plug-in with the default settings. Don't change any options!
Perfect Layout has many settings, but also many intelligent tools that scan the score and automatically set good options.

Then in a next step you can try to fine-tune some settings, if you like to change the look or style.

If you are new to Perfect Layout, don't change too many settings at once.
Usually you only have to fine-tune very few options.

Some common changes to the options are:
-Tight/loose spacing (see next paragraph)
-Measure number alignment
-Rehearsal mark alignment
-Staff/system distances
-If music spacing has not been applied to all measures, activate "Optimize->Always Apply Music (Re-)Spacing" -In parts with several staves (e.g. piano + 3 vocal staves): "Reset->Hide Empty Staves in Parts" may need to be deactivated
-In Finale's Preferences: the measure reflow settings

A very important option are the two presets at the right bottom of the main user dialog:
"Factory Preset 1 (Loose Vertical Spacing)" and "Factory Preset 2 (Tight Vertical Spacing)".
Select them at the very beginning of your experiment and then click on "Load".
These factory presets overwrite all options, not only the spacing values.

More info on "How to use Perfect Layout" in the following sections.
Get this document in printable format.

To get the most out of your Perfect Layout plug-in, you should use a fast computer that has a high GHz processing frequency. A frequency above 4.0 GHz or even 5.0 GHz will give you the best results when using this plug-in.
Keep in mind that Lua, the programming language used for this plug-in, is quite slow compared to C++ and other modern parallel programming languages.
Unfortunately the Finale plug-in interface is not optimized for processing large scores. This makes it slow sometimes.
You can find a comparison of computer speeds and how they work with the plug-in in the FAQ section.
When you run the plug-in for the first time, it may take a while for the main dialog to appear.
This is because the software is creating font metrics files in the background.
If you have many text fonts installed, especially huge Unicode fonts, the process may take longer than a minute or even up to 20 minutes on slow computers.
On Windows with Perfect Layout v1.0/2.0 you may also see a few black windows pop up during this process.

In some cases the progress bar won't work correctly on the very first run.
However, after the initial run, the start-up phase of the plug-in will be much faster and the progress bar will work fine too.
The Silver400/Gold400 edition are limited 400 measure and 36 (visible) staves.
The plug-in won't work if your score is above that limit.
In that case the "Ok" button in the main user dialog is disabled.
Enter all notation symbols as Finale® places them by default.
Don't waste time in manually correcting the placement of hairpins, custom lines, expressions or articulations. That's what the plug-in is for.

It's only important to make sure that the symbols were not placed ambiguously.
Otherwise the Perfect Layout plug-in might not optimize the symbol's layout as it is not clear which beat or which symbol it was originally intended to connect to.

Example 1:

Image 1:
Left: Unclear: On which beat should the hairpin should? Beat 3 or 4?
Right: Clear: It will end at the end of the measure

Example 2:

Image 2: Finale's placement options are very flexible, but sometimes it is difficult to detect if a placement was intended or is faulty.
Left: Overlapping connection points. Was the hairpin intended to be in the first measure or in the second measure on beat 1?
Why is mf connected to beat 3, but visible at the end of the measure after beat 4?
Right: Rather clear placement. Obviously the hairpin should be between the p and the mf. This would be sufficient for Perfect Layout.
However it would be even more precise, if the hairpin's end was attached to the same position (end of measure) as the mf.

Rule 1:
The plug-in will only change the placement of symbols, if it is very likely that the new position was originally intended.
(In other words: If in doubt, Perfect Layout leaves it out.)

The good news is:
The plug-in already has many rules for detecting and automatically fixing these scenarios.

For example a little offset or a little overlap usually is no problem, as in these examples:


Image 3: Overlapping hairpins that are connected to the same measure position are automatically corrected by the plug-in and horizontally optimized (at the start, the middle and the end).


Image 4: Overlapping unambiguous expressions are automatically corrected.


Image 5: Overlapping expressions and hairpins are automatically corrected.

Rule 2:
The clearer you place the symbols, the better they will be automatically optimized by the plug-in.
You don't have to be over-precise, that's the plug-in's job.


Recommendations for optimizing your Finale® default document:
1.) Smart Shapes: Turn on "SmartShape->Snap When Attaching to Beats"
2.) Expressions: For a more uniform look it is recommended to have all expressions in an expression category use the "Category Positioning" instead of individual positioning settings. This is especially recommended for dynamic expressions, tempo marks and tempo alterations as these symbols are usually on the below or above baselines and vertically aligned.
3.) Articulations: Make sure that the default placement of your articulations is set correctly and does not lead to collisions with notes.
Perfect Layout usually moves the articulations to their default position first - except when there are unusual collisions (like with slurs or ties).
This means: If you want to have an articulation appear below the note, don't use the default placement "Position: Above Note" and move it manually below, but use "Position: Place Below".
If necessary, you need to create duplicate articulations with different placement settings.

Things to avoid:
- Having two dynamics at the same measure position (except f p which becomes fp).
- Having dynamics between hairpin start and end points (unless this is what you want).
- Having dynamics and hairpins overlap and/or connect internally different than visually (as in image 2 above).
The plug-in assumes that you have applied the music spacing before running the plug-in.
So either you need to have Finale's automatic spacing activated (Preferences->Edit->Automatic Music Spacing), or you need to apply music spacing manually before running the plug-in (Utilities->Music Spacing->Apply ...).

Only in three cases Perfect Layout applies Finale's music spacing automatically:
a.) if the plug-in option "Optimize->Apply Music Spacing to Full Document Before Processing" is activated,
b.) if multi-measurests were not created in the parts and the part has many empty measures which would lead to a completely new system layout,
c.) if measures have certain note layer / second collisions, chord collisions and/or slash, blank or repeat staff styles.

See also 15.): The "Reflow Measures" settings from the preferences are taken into account when respacing.

Note: in Finale 25-27 Perfect Layout v3 will automatically deactivate the "Automatic Music Spacing" setting, so that Finale® won't change the layout after the plug-in.
Perfect Layout version 3 has a number of automatic measure/system layout features (more info here).

However, if you need certain layout features, like 4 bars per system or all rehearsal marks at system start, make sure to setup the measure layout in the score and parts manually before running Perfect Layout. If required, also add page breaks to the document.
Some automatic layout features (like shifting section starts to the next system) will only work, if there is enough space on the staff system or if only one bar is affected.
The recommended workflow is that no manual adjustments are done in the linked parts before applying Perfect Layout (except measure/system layout as under 5.).

This is because some manual adjustments might be removed by Perfect Layout, so you would have to do them twice.
However, it's no problem for the plug-in if you do any manual adjustments before applying the plug-in.
But it will probably save you more time if you do them after running the plug-in.

Excursus: Linked and Extracted Parts
It's highly recommended to use linked parts instead of extracted parts as they are automatically processed by the plug-in together with the score.
Especially with Finale 27.3 the linked parts feature was drastically improved.
For Perfect Layout an extracted part (i.e. a "score" with only one instrument) is the same as a linked part.
So all part-specific features and settings of Perfect Layout are automatically used on extracted parts.
Skip to the next step, if you use Perfect Layout version 3 in Finale 25-27.

If this is not the case, you need to switch off Finale's "Automatic Music Spacing" (Preferences->Edit->Automatic Music Spacing) manually before running Perfect Layout as this can't be done automatically.
It is important to switch it off, because otherwise the spacing corrections of the plug-in will automatically be removed by Finale after the plug-in has finished.
Note:
Even if you have deactivated "Automatic Music Spacing" you will get a warning message by the plug-in (unless you have deactivated the message), because it can't check the current state of that option.
Skip to the next step, if you use Perfect Layout version 3 in Finale 25-27.

Make sure to have "Accidentals->Use cross-layer accidental positioning" in Finale's document options activated.
Otherwise the accidental alignment won't work or even lead to colliding accidentals.
This setting can only be activated automatically through the new RGP Lua in Perfect Layout v3 (Fin25-27).
In all other versions this needs to be checked manually.

Only Finale documents originally generated in older Finale versions (before 2014) have this option deactivated by default.
In modern Finale documents this is activated by default.

Image: "Accidentals->Use cross-layer accidental positioning" must be activated
Finale's own pickup measure setup leads to many problems, especially in spacing.
It's highly recommended to fake the pickup measure instead with Finale's "Use a Different Time Signature for Display" feature.

To convert your old-style pickup measure, go to Document->Pickup Measure and click on "Clear Pickup".
Then open the Time Signature tool for the pickup measure, select the pickup duration in the "Number of Beats"/"Beat Duration" section, then click on "More Options", activate "Use a Different Time Signature for Display" and set the "Display" values to the correct time signature value (see image below for 4/4).
After the conversion make sure to re-enter rests, re-assign staff styles, chords and/or expressions if they have disappeared.


Image: How to setup a quarter note pickup measure in 4/4
An automatic horizontal and vertical alignment of music and text symbols is only possible, if the plug-in knows what the symbol means.

Perfect Layout uses three ways to achieve this:
a.) It includes a music font database with about 1000 music symbols from more than 500 music fonts, so it can decipher most of the music symbols.
b.) It analyzes the names of the expression categories.
c.) It compares the contents of text expressions with a few standard texts like pizz., rit., a2, cresc., etc. and suggests to move expressions to the corresponding category if necessary.

The better the expressions are assigned to the default categories, the better the alignment will be.
In other words:
Put dynamics expressions into the "Dynamics" category and tempo marks into "Tempo Marks" etc.
It doesn't matter whether there are multiple "Dynamics" or "Tempo Marks" categories or just one.
User-defined expression categories with the same key words as the default categories (e.g. "Dynamics for Vocal", "Rehearsal Marks 2") are recognized too.

The plug-in supports two special user-defined expression categories:
a.) "Cues": put all text expressions here that go together with cue notes or that are just cue texts like "Fl.1", "Perc.", "Vln.2+Vla.", etc.
b.) "In Parts Only": put all text expressions here that shall only be visible in the parts. The plug-in will hide them in the score.
The name of these special categories can be adjusted in the plug-in's settings.


Image 7: "Cues" category


Image 8: "In Parts Only" category

Note:
Only very standard texts like pizz., rit., a2, crescendo, a tempo, etc. are automatically moved by Perfect Layout into the correct category, if necessary.
For example if your document uses tempo expressions like "Very fast, like running", these are, of course, not automatically detected by Perfect Layout and must be moved manually to the correct expression category before applying the plug-in.
If niente circle expressions are not used in your score, skip this step.

Niente hairpins in Finale® are usually constructed with a "circle" expression and a hairpin.
Perfect Layout automatically connects them visually.
To improve the look, the niente expression should have an opaque enclosure, so the hairpin is not visible through the circle.

The plug-in automates this process and has three requirements:
a.) The circle can be an "o", "O" or "0" symbol from any text font or a "o" symbol from any supported music font.
b.) The niente expression must be located in the "Dynamics" category.
c.) Perfect Layout v2 only or Finale 2014 only (automated in Perfect Layout v3, Finale 25-27):
    Select any (!) enclosure in the expression designer dialog (unfortunately it's not possible to this through a plug-in).
    Don't click on "Edit" or specify the enclosure settings. This will be done automatically by the plug-in. Just select an enclosure like "Square" or "Circle" (see image 7). Then click on ok.


Image 9: Enclosure "Square" selected


Image 10: Before and after running the plug-in
The square enclosure is automatically reduced to the size of the niente circle.
MusicXML imported documents or old Finale documents can greatly benefit from Perfect Layout's automatic optimizations. Its main function is to accurately assign expression categories and align expressions. For example, simple expressions such as "a tempo", "arco", and dynamics can be easily identified and handled accordingly.

However, ambiguous text expressions can be a bit trickier. If your score only uses standard text expressions, it's best to simply run the plug-in without manually changing any expression categories. But if you notice a text expression isn't getting a proper placement, you can undo the plug-in, adjust the expression category assignment, and run it again.
For the best results, enable the "Use … Category Positioning" option (see image 11a).


Image 11a: "Use Tempo Marks Category Positioning" in the Expression Designer dialog
In certain cases, it may be necessary to stop the plug-in from moving certain expressions, such as technique or dynamic expressions that need to stay in a certain place so that the score fits on the page. To do this, you can use the EXCLUDE command in the Expression Designer dialog of the particular expression that is to remain stationary.

If you have expressions that should be excluded in some parts of the score but not everywhere, you should create a duplicate of the original expression and apply the EXCLUDE command in only the necessary places.

On the other hand, the FORCEINCLUDE command can be used when dealing with long text expressions that are far away from the staff. By default, these are excluded from vertical alignment and spacing, but adding FORCEINCLUDE to the description text will ensure that they are included, even if this results in larger vertical distances between the staffs.

Example: To exclude an expression simply add EXCLUDE to the description in the Expression Designer dialog:
Image 11b: Adding EXCLUDE to the description

Adding the word ALLOWSHIFTRIGHT to text expressions can be used to allow them to shift to the right of dynamics on the same measure position. This shift will even be done automatically (i.e. without ALLOWSHIFTRIGHT) if the starting point of the expression in the measure is not unclear due to the shift.
However, sometimes, such as in image 11c, ALLOWSHIFTRIGHT must be added to make sure the starting point remains clear.
Note: Sometimes it's better to put technique expressions above the staff to make the starting point more evident.
For more examples of multi-expression collisions see here.


Image 11c: Without (left) and with ALLOWSHIFTRIGHT text
The short 8th notes otherwise make the start point unclear.

Starting from PL v2.2.3 it's also possible to add EXCLUDE, FORCEINCLUDE, ADDEXTRASPACE or ALLOWSHIFTRIGHT to the expression category name. This will apply to all expressions in that category.


Image 11d: EXCLUDE in category name

The tags DONOTLOWER and DONOTRAISE are for text only expressions that are affected by the "Express.->Snap Text Expressions to Symbols" feature. This feature prevents a placement too close to the staff while at the same it allows movement away from the staff in case of collisions.
If the description text of the expression includes any of these tags, the expression will not be moved closer to the staff than the default settings of the expression allow. I.e. the expression is "stopped" at its baseline.
DONOTLOWER is for expressions above the staff, DONOTRAISE for expressions below the staff.

The tag USEENCLOSURE can be used to force Perfect Layout to use the metrics from the opaque background as the collision margin of a text expression.
By default Perfect Layout used text or symbol metrics for collisions, but not the opaque background.
This can be useful for movement name titles between two staff system, or for other large text blocks between two staves where you want some extra blank space.

For unknown custom lines, you can use the hidden tag known as PUTONTOP which forces the smartshape to be put above the staff without collisions (for more info see here).
This is only necessary for user-defined custom lines and not for standard custom lines, such as ottava and trill, which are automatically placed above.
It is important to add the text PUTONTOP to one of the text fields with a hidden text style, so that it does not print in the score.


Image 11e: Custom Smart Line with Hidden "PUTONTOP" Text


Image 11f: "PUTONTOP" in the text dialog

Adding the word ABOVECHORD to either the description field of an expression or the name of an expression category in Perfect Layout v3+ will place the expression above chord symbols or other "normal" expressions.
For more information on ABOVECHORD, please visit the help page for the alignment tab.
The Perfect Layout plug-in reminds the user to run other layout plugins like Patterson Beams (Beam Optimization) or JW Yada Yada (Tremolo/Beam/Stem Optimization).
These plug-ins also improve the layout and their features are not included in Perfect Layout.
They should be run before Perfect Layout. Running them afterwards can introduce new collisions or result in an unbalanced staff spacing.

When dealing with a large document in Finale that includes the use of "real whole rests" instead of the default whole rests, it is recommended to run Finale’s own “Change to Default Whole Rests” plug-in before Perfect Layout.
Doing this is much more efficient and faster than using the JW Lua implementation, which can take an extended amount of time on large scores.
For smaller scores, with less than 100 measures and 20 instruments, it doesn’t make much of a difference.
Generally, it is not necessary to use "real whole rests" in Finale, and Perfect Layout will optimize them to the default setting.
The "Reflow Measures/Systems" settings in Finale's preferences are important for ensuring that the plug-in works properly.
They help maintain or change the measure and staff system layout as needed.
Depending on the state of your score and linked parts, you may prefer one or the other.

Before running the plug-in, please adjust Finale's Preferences->Edit->Automatic Settings to your needs.

Note: In Finale a "locked system" means that the measures will always stay in that system and not move to the previous or next system. To lock a system, select the page layout tool, select the systems to lock and click on Utilities->Lock Systems.

Which reflow settings work best for me?

The basic rule is:
a.) For most documents the best option is to activate the three options "Across Systems (Maintain System Locks)", "Reflow Systems Across Pages" and "Automatic Update Layout" (see image 12a).

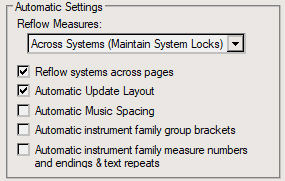
Image 12a: Best settings if you have some locked and (mostly) unlocked systems

You should use "Across Systems (Maintain System Locks)" if you have locked some staff systems in your score or parts and want to maintain that staff system layout.
It is also possible to only lock a few systems, but keep the other systems unlocked.
Then Perfect Layout will only adjust the unlocked systems, if necessary.

A common use case is: locked systems in the score, unlocked systems in parts.
Then Perfect Layout can adjust the bar layout in the linked parts and eliminate collisions by moving bars to the next system.

b.) For documents with many empty measures and no multi-measure yet or if you want to give Perfect Layout the most freedom for the measure layout, it is recommended to have "Across Systems (Remove System Locks)", "Reflow Systems Across Pages" and "Automatic Update Layout" activated (see image 12b).

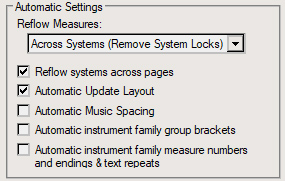
Image 12b: Most flexible setting which allows shifting measures to the previous/next system and staff systems to other pages

c.) If you have already optimized the measure layout manually and PL should not move measures to other systems, use "Only Within Systems" (see image 12c).
In this mode only the spacing within a system can be altered through Perfect Layout (e.g. on horizontal collisions).
This setting is also useful if you have already run Perfect Layout for this score or part before and now want to apply it again only to a selected region.

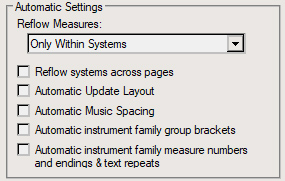
Image 12c: Restrict setting which locks all measures to their current system and all systems to their current page

Note 1: If a linked part has no multi-measure rests yet and many empty measures and automatic multi-measure rest creation is activated, Perfect Layout will automatically reflow the measures by default if the layout in a part has significantly changed through many multi-measure rests.
In this case only those parts will be affected with a measure reflow where the new multi-measure rests have significantly influenced the layout.
To deactivate that automatic reflow, unselect "MMRests->Automatic Measure Reflow if the Number of Multi-Measure Rests has Significantly Changed" in the Perfect Layout user dialog.
Note 2: If the "Only Within Systems" setup is used, the page turn optimization ("Systems->Optimize Page Breaks with Rest Bars") in Perfect Layout will be deactivated as the plug-in can't move the empty bar to the end of the page anymore.
Note 3: If you still want to lock the measures to a system, but allow PL to move whole systems to the next page (especially in linked parts for the page turn optimization), please also activate "Reflow Systems Across Pages" (see also next section d.)

d.) If your staff system layout (especially in the parts) is not optimized yet, activate "Reflow Systems Across Pages".
If you want Perfect Layout to optimize the part layout for good page turns with rest bar at the end of the page, you must activate "Reflow Systems Across Pages".
In most cases it is makes sense to have "Reflow Systems Across Pages" activated.

Note 4: If you want to maintain your system layout of the score, but allow Perfect Layout to move systems to other pages in linked parts, lock all systems in the score (Utilities->Lock Systems) and use "Across Systems (Maintain System Locks)".

Note 5: After the plug-in processing, the "Across Systems (Remove System Locks)" setting will be automatically reset to "Maintain System Locks" to ensure that the layout that Perfect Layout has created is not destroyed by Finale's own automatic layout feature.

Attention! Finale's automatic reflow settings are global options.
However, it would make more sense to have them as a document option that is stored individually in each document file.
When this feature was introduced in Finale, there was a lot of discussion, because these options which automatically update the layout can accidentally destroy an already optimized layout.

For example, if "Reflow Across Systems and Pages/Unlock Systems" is activated, you load an optimized score with locked systems to fix only a little detail, Finale will automatically remove all locks and reflow the measures without warning the user.
Therefore, please always use these Finale settings with caution!
The recommended use of the Finale reflow settings is:
1.) During the creation of a new score, set it to "Reflow Across Systems (Unlock) and Reflow Across Pages".
2.) When the score creation is finished, change it to "Only within systems/Reflow Across Pages", so that you can only manually shift measures and systems.
3.) When the layout is finished, change it to "Only within systems/Don't Reflow Across Pages" or even the most strict "Do Not Reflow".
4.) Before loading an old file that is already optimized and that you only want to have a look at, always set the reflow settings to "Do Not Reflow".
5.) If you accidentally loaded an old optimized file and Reflow was activated, do not accidentally save the document (note Finale's Auto-Save feature!) as this could overwrite your optimized layout!

Therefore it would make more sense to link Finale's reflow settings directly to the document:
During the different stages of the document creation, these options are used more and more strict.

Please set the "Manual Positioning" option in Document Options->Music Spacing according to your needs.

If it is set to "Clear" or "Ignore" the manual positioning might be removed by Perfect Layout.
If it is set to "Incorporate", the manual positioning will be kept unless there are collisions.
The plug-in can be used in 'Concert Pitch' or 'Transposed Pitch' mode.
However, before using the plug-in, it is recommended to set the score and parts to the desired pitch for optimal horizontal and vertical alignment and music spacing. If you change the display mode later, the plug-in adjustments may not match correctly due to extra accidentals, low notes, key signatures, and other factors.

If you need to change the pitch mode after running the plug-in, you can.
In such cases it is recommended to run the plug-in again on the changed parts.
Automatic system and staff balancing will adjust the systems to reach the bottom of the page (see image 14).
Space above the first system on all pages except the first page may be automatically reduced when the option "Systems->Adjust Top System Margin to Maximum Position of Top Staff" is activated.

That's why it is important to set the top and bottom margin to the correct value beforehand.


Image 14: The systems will be aligned to the bottom margin of a page
If "Systems->Adjust Top System Margin to Maximum Position of Top Staff (Score)" was activated, the top staves on the second and third page would also align with the top page margin.

At this point, the bottom margin serves only as a marker for the bottom margin of the staff.
It can be changed later for improved placement of text objects.

There are three alignment options for the page bottom that you can choose from in the plug-in settings:
a.) Align the page bottom margin with the bottom staff line.
b.) Align the page bottom margin the lowest element on the bottom staff.
c.) Align the page bottom margin with the bottom staff line plus a fixed margin.

If possible, use Finale's Document->Page Format value for the page bottom margin.
This avoids system and staff layout optimization issues when the values do not match the actual page format, especially if the plug-in generates additional pages.

Note:
Perfect Layout v3 automatically adjusts the page bottom margin on the first page when it conflicts with the copyright notice. To enable this feature, activate "Optimize->Auto-Adjust Bottom Margin for Colliding Page Texts on Bottom of First Page".

Perfect Layout v2 does not detect collisions with page text elements and systems.
If the score has a large copyright notice at the bottom of the first page, the bottom margin of the first page should be positioned above the notice to mark the bottom of the staff. This also ensures that the bottom margin of the first page is above the bottom margin of the next page (see image 14 above).
To resize the bottom margin with your mouse, right-click on the first page and select "Adjust Current Page Only", then move it with a left click. This leaves the other bottom margins unchanged.
When opening pre-Finale 26 documents in Finale 26/27, make sure to select "Keep Positioning" of articulations in Finale's Preferences->Open->Articulation Conversion. If you select "Enhance" instead, some articulation placement might not be corrected by Perfect Layout.

Note: Don't forget that the articulation placement of new documents created with Finale 26/27 is NOT compatible with Finale 25 (or previous versions) anymore. If you plan to use the document in Finale 25 or Finale 2014, don't create it with Finale 26/27, but with Finale 25.
Always save your Finale® document file before using the plug-in to avoid data loss in the event of an unexpected Finale® exit or crash.
A termination usually results in an error message like the one shown in image 12.

Image 12: plug-in Termination Error

In this case, please contact support. The issue can usually be resolved quickly by sending us your Finale® document and your Perfect Layout settings file JALAYOUx.ini which can be found in your Finale user folder.

Five types of crashes are known of which three are relevant for the Perfect Layout plug-in:
a.) When used with Finale® 2014/2014.5, the plug-in may crash with large scores due to 32-bit memory limitations.
The exact limit for this type of crash is not known, but it has been observed that scores with 50 or more staves, 300 or more measures, and file sizes of 1.5 MB or larger have crashed Finale® 2014.
How to prevent this: these crashes don't occur in Finale® 25-27 / 64 bit.
b.) Corrupted Finale® documents can also cause the plug-in to crash, especially if they also cause other third-party plugins or Finale's own plugins to crash. This seems to be a Finale® issue.
c.) The Finale® plug-in crashes occasionally due to a "Measure Number Region" error that occurs approximately every 100 to 200 calls without closing Finale®. It seems to be a bug in the JW Lua PDK, but the exact cause has not been determined. In this case, simply restart Finale® and rerun the plug-in.
This crash can usually be identified by looking at the ES Perfect Layout.log or JALAYOUG.log file: it is the case when the last entry is about measure number regions.
d.) There are some cases known to cause Finale® to crash due to the JW Lua plug-in interface. However, none of these cases are implemented in the Perfect Layout plug-in, so this type of crash does not occur.
e.) It is possible, though unlikely, for an unknown type of crash to occur.
If a crash occurs, restart Finale® and try running the plug-in again. If the crash occurs again, please contact our support.
It is recommended to run the plug-in on the full document in "Edit Score" mode as only this activates all features and also processes all parts.
However it's also possible to run the plug-in on a single part only (see also FAQ: PL in 'Parts' and 'Score' View).

You can either manually select the full document before running the plug-in or select nothing which will automatically select all. The plug-in can be run in Scroll or Page View.

There are two ways to start the plug-in:
1.) Standard: Click on Plug-ins->JW Lua->ES Perfect Layout.


Image 13: Starting the plug-in

2.) Within JW Lua: this is described here.

Features that will only work in full document mode:
- System and staff balancing (also works if a full page is selected)
- Optimization of expression default positions and default categories (e.g. for MusicXML import)
- Expression baseline changes
- Updates on measure number ranges in multi-measure rests
- Invalid slur deletion
- Fixing weird top staff margins after staff deletion

The plug-in will remind the user of many tasks listed above by default.
It is possible to turn off these reminder dialogs (General->Bypass All Warning Dialogs)
But it is highly recommended to keep them in as it is very likely that one has forgotten one or two things before running the plug-in.
If you find that other settings work better, you can undo and rerun the plug-in with new parameters.

Running the plug-in multiple times on the same document is possible too.
However, the result may not be identical!
Especially the hairpin placement might change as their original position isn't known anymore.
For example a hairpin might connect to a dynamic which was too far away on the first run, but is now close enough on the second run (however, this might even be preferred...).

The undo/redo feature lets you quickly compare results before and after, but may not work properly if the plug-in has changed the music spacing significantly.
There is a known bug where page breaks in the parts cause staff systems to disappear from the score when clicking "Redo".
Sometimes the page layout also doesn't update when you call "Redo", cluttering the spacing.
However, undo/redo works as expected if the music spacing has not changed much.
If any manual adjustments are still required, now the time has come.
It's also possible to re-apply the plug-in on selected areas, if any manual adjustments were made that could be improved by a selective rerun.
The following Finale® preferences and document options will change through the plug-in:
If the measure reflow option "Edit->Preferences->Across Systems (Remove System Locks)" was activated, it will become "Across Systems (Maintain System Locks)" to not destroy the layout that the plug-in has created.
Read more about solving "Measure Reflow" issues in the Perfect Layout FAQ.

If the document option "Multi-Measure Rests->Update Automatically" was activated, it will be turned off to keep the new multi-measure rest layout.

Finale 27.3+/RGP Lua/Perfect Layout v3+ only: The preferences option "Edit->Preferences->Automatic Music Spacing" will be deactivated in order to preserve the music spacing layout that Perfect Layout has created.

Don't forget to reset the Finale® preferences according to your needs for other documents!
Finale® doesn't save "Edit->Preferences"per Finale® document, but only globally. So you may have to adjust these values for your next document.
An easy way to spot the differences between before and after Perfect Layout is using PDFs:

a) Install a PDF printer (some recommendations can be found here).
b) Install the free PDF tool "PDFsam Basic" which is available for both macOS and Windows
c) Add a page text element with the text "   Original Look:   " (notice the three empty leading and trailing spaces) to your score which appears on each page (Set it to "All Pages" in Finale's Frame Attributes Dialog).
Perfect Layout automatically converts this text element (if it has the three leading and trailing spaces) to "After Applying Perfect Layout:".
d) Save the document (preferably with a postfix like "Before PL")
e) Print a PDF of the score and/or parts before running Perfect Layout
f) Run Perfect Layout
g) Save the document with a new name (preferably with a postfix like "After PL")
h) Print a PDF of the score and/or parts after Perfect Layout
i) Optional: If you have printed both a score AND some parts, merge all "Before PDFs" with the "Merge" tool from PDFsam Basic and then all "After PDFs" into a second PDF.
If the number of pages per part has changed through Perfect Layout, you might want to add additional empty pages, but that's already pretty advanced...
j) Use the tool "Alternate Mix" from PDFsam Basic to merge the before with the after PDF file.
k) Open the merged PDF file in your PDF reader. Now you can easily browse forward and backward and see the differences.

This short video shows the process in 1m40s:

Video: How to easily spot the differences in the score before and after Perfect Layout